Jul 23, 2013

Moving On

Sometimes we grow out of things we start.  Like this blog.  I slowly began finding reasons I didn't feel that this blog fit me anymore.  With a name like Dabbling Domesticity I didn't feel like this blog could grow with me.  Why?  Well, I started finding the "domestic" label problematic for my self definition.  Here's why.

I started this blog during a tough time in my life.  Graduating college was a really rough transition for me.  I had a hard time figuring out who I was outside of school and how to live my life.  I didn't have any promising career (or any at all for that matter) opportunities, and I felt like everyday I was confused about what life after school was supposed to be like.  I had basically lost grasp of the little bit of self worth I started out with before graduation (self esteem has always been a struggle for me).  So, like a lot of people, especially young women, I clung to domestic chores as a way of self definition, and a way to occupy the time I didn't know how else to spend. Domesticity had become a distraction from the problems I didn't know how to solve.  As I have overcome a lot of the obstacles I was crippled by after my college graduation, I have come to realize that I was using domesticity as a crutch.  And that is why I've moved on from this blog to one that isn't completely wrapped up in the topic I was trying to loose myself in for 3 years.

I'll be honest, I still cook and clean, though not as obsessively as before (... um I spent an average of 3-4 hours on dinner EVERY night at the peak of my domestic preoccupation...), and I still love making things.  The new blog, Pico Picot is pretty similar to this blog in a lot of ways, but to me its a new leaf.  Pico Picot is a more positive blog for me.  One filled of my passions, and a love for all things creative! I hope that if you liked this blog that you will check it out.

Lots of Love!
Amy

Jan 6, 2013

Happy Epiphany!


A few years ago my friend Selina told me about her tradition to take down Christmas decorations on January 6th (aka Epiphany).  I loved the idea of having an official holiday to end 'the holidays.'  It seems a little depressing to be taking down decorations right after Christmas, but how long is to long to leave all the holiday cheer lingering around the house?  


Epiphany is my little (stress free!) holiday to reflect on the Christmas season that just whizzed by, and to enjoy the last time I will give my Sufjan Stevens Christmas cds a spin for a while.  I hope you all had a wonderful Christmas and New Years, and are all geared up for 2013.  Any new years resolutions?  Yeah, me neither.  Lets just give it all we got and make 2013 a year to remember!!  Hey, the world didn't end with all that Mayan calendar stuff, so it looks like we have already got a leg up on the game, right?! 


You know you want just one more Christmas song!!  Common' give it a little listen, and celebrate Epiphany in your own little end of Christmas way!


Jan 4, 2013

Roasted Butternut Squash Rice


Its cold here. And to make it worse, it is rainy too.  A major bummer since I'm the type of person that is really unhappy when I have to pull out (and actually wear) the one pair of jeans I own that haven't been cut off  into shorts yet.  Disappointing as it may be, I know how to comfort myself.  Something warm, gooey, and delicious for dinner.  Duh!  Anyways, this recipe for roasted butternut squash rice is perfect for days like today.  And guess what?!  Its actually pretty healthy.  You've got your butternut squash full of all that vitamin c and beta-carotene, and brown rice that is definitely not bad for you.  Now, there is butter, but that can easily be left out our exchanged for vegan margarine or a little oil.  It is only there to add a little extra flavor and creaminess!


Ingredients: 
1 butternut squash - cut in half lengthwise and seeds scooped out
1 head of garlic - top quarter inch or so cut off to expose cloves
a little oil (whatever kind is fine)
1 cup brown rice
2 onions - diced
1 tsp thyme
3 tbsp butter (optional - can be replaced with a small amount of oil)
handful fresh parsley  - finely chopped
salt and pepper to taste

What to do: 
1. Roast Stuff:
    -preheat oven to 425
    -line baking sheet with foil
    -place butternut squash and garlic on baking sheet and oil it all down
        -oil the top and bottom of the squash and garlic; pour a little more over the top of the garlic
    -stick it all in the oven and roast until softened
       -about 25 min for the garlic and 40 min for the squash
2. Make Rice (these are general brown rice making instructions y'all)
    -put your rice and 2 1/2 cups water in saucepan.
    -Put lid on your pan and bring to a boil.
    -Reduce heat to low and allow to simmer with lid on for 45 min.
3. Make your butternut squash mix
    -once you remove your now softened squash from the oven,you probably want to let it cool a little
    -use a spoon to scoop out all of the meat and discard the skin.
    -squeeze the garlic to release the roasted cloves.  Throw them in with the squash.
    -use a fork to mix it all up.  Make extra sure to really mash up those garlic cloves (they are the best part)
4. Mix it all up!
    -melt butter (or oil) in skillet on medium heat
    -saute the onions in butter until softened
    -add thyme - and saute for about a minute more
    -add butternut mixture, rice and stir well to combine.
    -remove from heat, add salt and pepper and throw in the parsley.
    -stir it all up and serve warm.

Nov 14, 2012

DIY Custom Dog Bowl


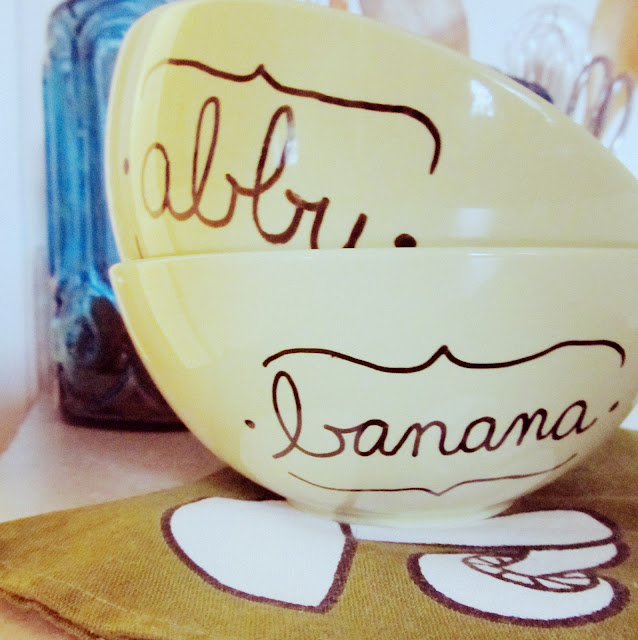
I LOVE my ladies!!  They are sweet, weird, and hilarious little fur balls.  I had been wanting to makeover their food and water station for a while, but I was drawing a blank as to how I would make something unique and special just for them.  Enter glass paint markers.  I decided to make matching customized food bowls using a paint marker designed for projects exactly like this!


This is a super quick and painless project that would make a perfect gift for the fur balls in your life.  The best part about this project is you only need two supplies: a glazed ceramic or porcelain bowl and a porcelain or glass paint marker.  That's it!  I used a DecoArt Glass Paint Marker (Hobby Lobby) and I would definitely recommend it.  The paint set way better than I thought possible.  It almost looks like part of the glaze.  Whatever paint marker you choose, make sure to read the directions. Proper paint application will be dishwasher safe and last longer than incorrect application. Also, pay close attention to any food safety warnings on the paint marker's packaging.  The DecoArt Glass Paint Marker is NOT FOOD SAFE.  This is fine, but important to consider.  Do not put paint that is not food safe in a location that will come into direct contact with food or dog tongues.  The outside of the bowl works fine.  


Step One: Wash bowl and dry thoroughly

Step Two: Write your pet's name and any design you want to add to your bowl.  (I really like the Art Deco Glass Paint Marker because the paint drys slowly.   I could easily wipe off mistakes with a damp paper towel.)

Step Three: Follow manufacturer's instructions for setting the paint.  This should involve baking the piece in the oven for some amount of time.  DO NOT PUT BOWL IN PREHEATED OVEN.  This will increase the chances of your bowl cracking.  Instead place the bowl in an unheated oven and then preheat the oven and the bowl together.  When the oven reaches the temperature required, start your timer and bake for the appropriate amount of time according to your paint marker's instructions.  After baking, do not remove the bowl from the hot oven.  Again, this will increase the chances of cracking your bowl.  Turn off the oven and crack the door.  Allow the bowl to slowly cool down and remove when it has cooled enough to handle with bare hands.  This could take 1+ hours.

That's it.  I was really happy with how my bowls turned out!  I'm excited to try out more projects with my paint marker!

Nov 3, 2012

How to Cook Greens - A Basic Recipe


I am one of the few people I know lucky enough to grow up eating greens. Lots of greens. Collard,
Mustard, and Turnip greens to be precise. I’m always surprised when people haven’t tried, or even
heard of greens! What did your granny feed you people?!

Now, there are a lot of different types of greens, and even more ways to cook them. I've been cooking
greens ever since I had my first kitchen away from home, and this is my absolute favorite way to make
them. My technique isn't much like the traditional, cook the living daylights out of them and load it
down with some sort of pork product, method (this is totally delicious by the way), but my way is still
delicious and way more healthy than cooking them the oldie fashioned way.

What you will need:

One bunch of greens, 2 if they are really tiny any variety is fine (I used Yakatta-Na, an asian variety, but its also great with mustard, turnip, collard, and kale greens - NO SPINACH)

1tbsp olive oil

2-3 thin slices of onion quartered widthwise

2-3 large cloves of garlic sliced very thin

½ lemon


Instructions:

Prepare the greens:

Cut off the large stalks at the end of each leaf – you may need to remove the bottom inch or so of the
leafy part if the stalk is really big. Cut each leaf in half lengthwise and then cut it into one inch pieces
width wise. (I think the best way to do this is make a little stack of leaves so you can cut more than one
leaf at a time). Put your chopped up greens in a colander and give them a good washing.

Steam your greens:

Put an inch or so of water in a stock pot. Insert a steaming basket and then pile in your washed and
chopped greens. Cook on medium high with the lid on your pot. Rearrange the greens with a pair of
tongs occasionally so that they will steam evenly. Steam until your greens are nice and tender (how
tender depends on you, some people like them a little crunchy, and some people like them all the way
soft).

Season your greens:

While your greens are cooking, heat up the oil in the skillet on medium heat. Suate the onions for a few
minutes until softened. Add garlic and cook until golden brown (keep a close watch so you don’t burn
the garlic). When your greens have reached an acceptable tenderness add them to the skillet along with
a pinch or two of salt. Toss well to coat the greens with the oil. Remove from heat and squeeze the juice from the ½ lemon on top. Serve while still warm.